
arrow_backBACK TO BLOG
Drum Recording : From Tuning to Tracking – A Complete Guide for recording drums
Drum recording is one of the most important and technically demanding parts of music production. Recording acoustic drums in a studio relies on four pillars: room acoustics, drum tuning, selection of microphones and microphone placements.
A well-recorded drum kit provides the rhythm, energy, punch, and sets the foundation for a song. To achieve this, without proper tuning, microphone selection, microphone placement, phase alignment, gain staging, and careful mixing, no amount of post-processing can fix a tracking session.
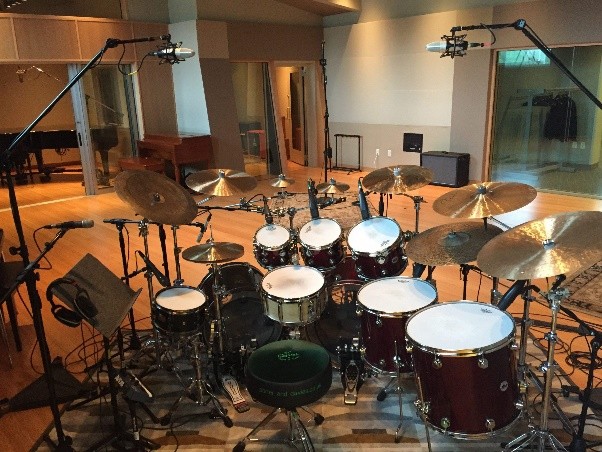
How to Prepare a Drum Kit for Recording
Preparing the drum kit properly before recording is essential for getting a clean, balanced, and professional drum sound. Most problems are easier to fix before recording than during mixing.
Inspect the drum kit before setting up microphones:
- Check all drums, stands, pedals, and hardware.
- Tighten loose screws, bolts and wing nuts.
- Check for unwanted rattles or vibrations.
- Make sure the kick pedal works smoothly.
- Ensure cymbal stands are stable.
Tuning the Drums
Tuning an acoustic drum kit before recording is critical because microphonic capture amplifies tone, overtone flaws, and phase relationships far beyond what is noticeable in a live room.
- Tune the kick drum for the required amount of low-end and punch.
- Tune the snare for the desired crack, body, and sustain.
- Tune toms so that each has a distinct pitch.
- Make sure the tension is reasonably even around each drum.
- Tune the kit according to the musical style and arrangement.
Control Unwanted Resonance : Drums can produce unwanted ringing and overtones.
- Use appropriate damping when necessary.
- A small amount of damping can control excessive sustain.
- Avoid over-damping because it can make the drums sound lifeless.
- Use gels, tape, muffling rings or other suitable methods when required.
Cymbal Preparation :
- Clean cymbals to remove oily buildup if looking for bright top-end sparkle, but avoid over-polishing if a darker vintage tone is preferred.
- Replace worn cymbal felts and plastic sleeves to avoid metal-on-metal squeaks and unwanted stand vibrations.
Selection of Microphones for drum recording:
A typical drum recording setup combines a combinations of close microphones, overhead microphones, and room microphones to capture punch, attack, body, cymbals, stereo image, and room ambience. Lets check out the different types of microphones and the expected sound color needed for a good sounding drum kit.
| Drum Element | Sound Characteristics | Recommended Mics |
| Kick -In | Maximizes attack transient, click, and beater punch. | Boundary (Shure BA 91A, Behringer BA 19A) |
| Kick – Out | Captures low-end sub frequencies and natural bass drum body. | Large Diaphragm FET Condenser or Dynamic Sub-Mic (Shure Beta 52A, AKG D112, Audix D6) |
| Snare (Top) | Captures stick attack, rim impact, and main body tone. | Dynamic (Shure SM57, Audix i5) |
| Snare (Bottom) | Adds high-frequency sizzle and wire articulation. (Flip phase relative to top). | Any Small Diaphragm Condenser or Dynamic (Audix i5, AKG C451 B) |
| Toms ( Low tom & High Tom) | Clear shell pitch and attack punch while rejecting adjacent cymbal bleed. | Dynamic Mics (Sennheiser MD421, e604) |
| Floor Tom / Side Drum | A low-end depth and chest-thumping weight without losing the transient stick attack | Mid-size Dynamic mics (Audix D4, Shure Beta 56A) |
| Hi-Hat | Edge detail and stick definition if overheads need extra hat control. | Small Diaphragm Condenser (Sennheiser e614) |
| Overheads (Stereo) | Captures full kit balance, stereo width, and cymbal high end. | Pair of Matched pair Condensers (ALH C414, Neumann KM 184) |
Mic Placements
Kick Drum Miking
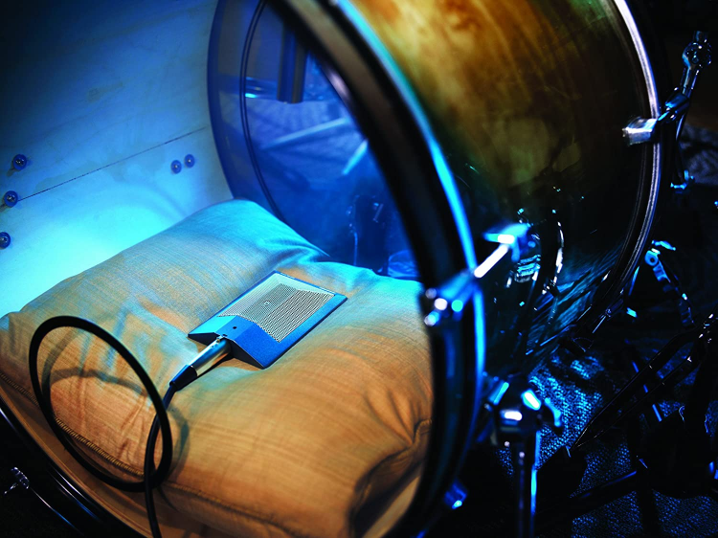
Kick In: Purpose: Capture punch, and beater attack.
- Use a boundary microphone.
- Place it inside the kick drum.
- Position it toward the beater area for more attack.
Typical sound : Near beater → more attack/click
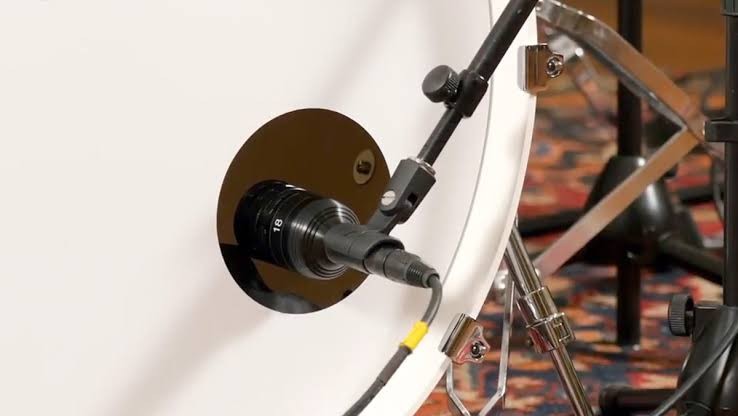
Kick Out Purpose: Capture low-end weight.
- Use a dynamic kick microphone or suitable large-diaphragm microphone.
- Place it inside the resonant-hole.
- Move it farther from the beater for a rounder, fuller sound.
- Adjust the angle to control unwanted high-frequency attack.
Typical sound : Farther away → more body and low end
Snare Drum Miking
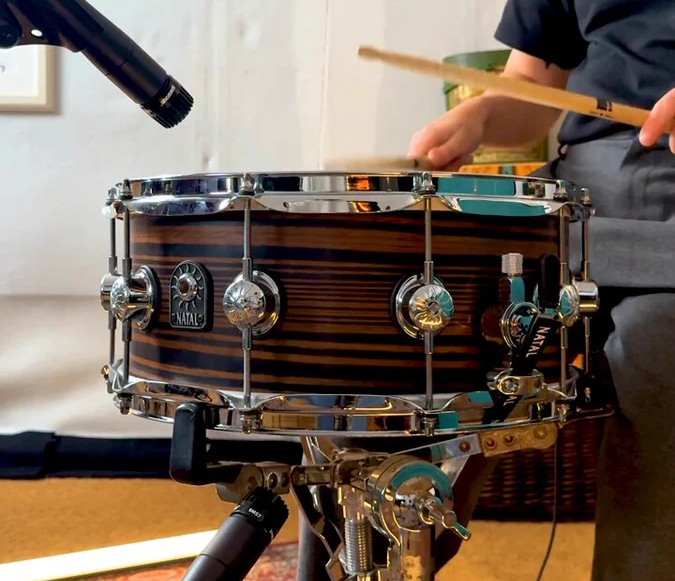
Snare Top
- Use a dynamic microphone.
- Position it approximately 2–5 cm above the drum head.
- Point it toward the area between the center and edge.
- Angle it to avoid excessive hi-hat bleed.
- Moving toward the center gives more attack; toward the edge gives more body.
Snare Bottom
- Place another microphone underneath the snare.
- It captures the snare-wire sound and brightness.
- Reverse the polarity of the bottom mic if necessary and check the sound in combination with the top microphone.
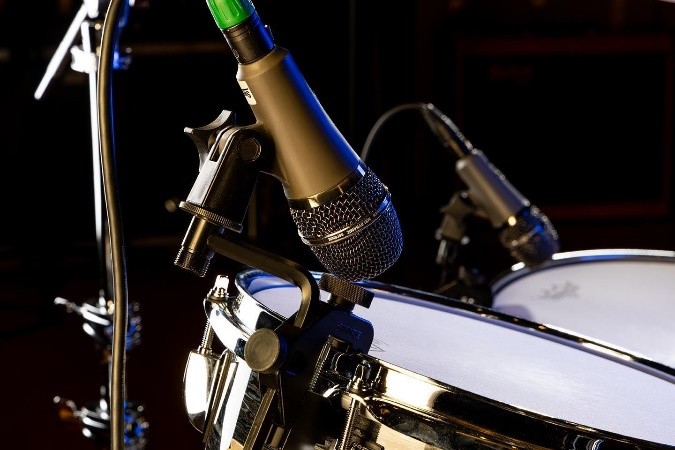
Tom Miking
Purpose: Capture the body and attack of each tom.
- Usually use dynamic microphones.
- Place the microphone a few centimeters above the head.
- Aim toward the center or slightly off-center.
- Angle the microphone to reduce cymbal bleed.
- Keep the microphones positioned consistently across the toms.
Hi – Hat Miking
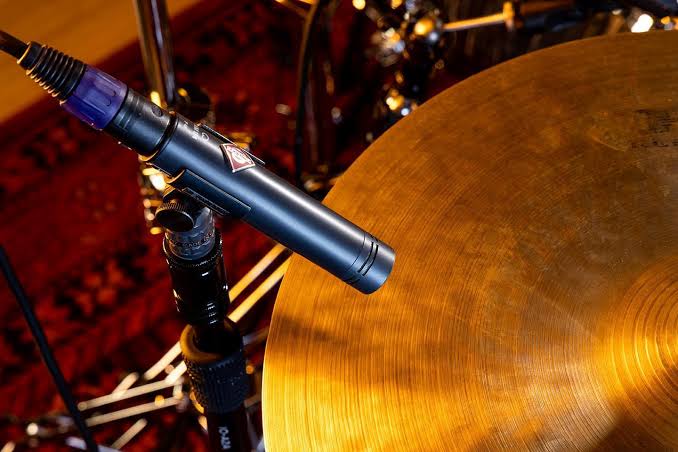
Purpose: Capture hi-hat detail and definition.
- Use a small-diaphragm condenser or similar condenser microphone.
- Position it above the outer edge of the hi-hat.
- Avoid pointing directly at the center where the cymbals meet.
- Keep it away from the snare’s direct sound as much as possible.
- Adjust the distance to control brightness.
Overhead Miking
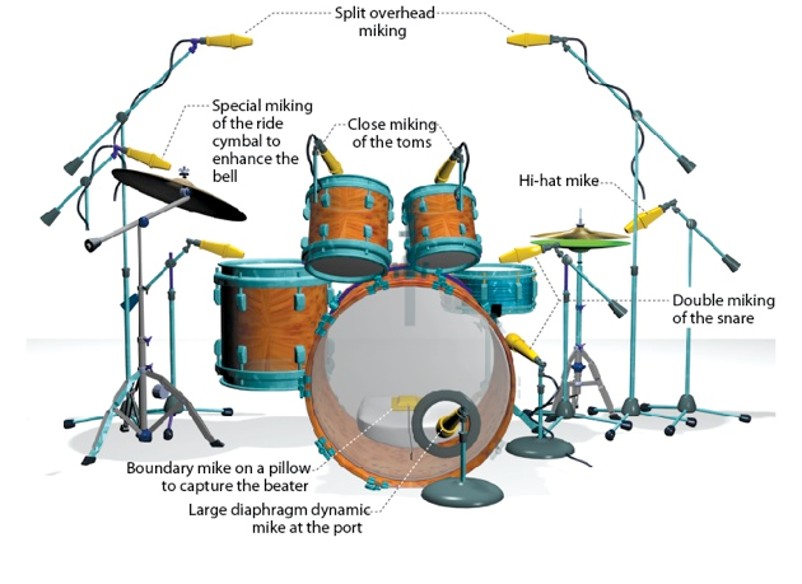
Overheads are extremely important because they capture the overall kit sound and cymbals.
- Common stereo techniques include like XY, ORTF, Spaced Pair (AB).
- Make sure both microphones are positioned carefully.
- Keep their distances from important parts of the kit consistent where appropriate.
- Listen to the overheads as a stereo pair, not just individually.
- Measure distance from snare center to each overhead mic using a tape measure or mic cable to ensure perfect time alignment.
- Overhead 1: 3.5–4 feet directly above snare drum center.
- Overhead 2: Positioned over the floor tom side, pointed at the snare, exact same distance from snare center as Overhead 1.
Gain Staging
Set appropriate input levels before recording.
- Avoid clipping the preamps or audio interface.
- Leave sufficient headroom for loud drum hits.
- Perform a sound check with the drummer playing at the actual recording intensity.
- Record clean signals without unnecessary digital distortion.
Phase and Polarity
Phase is especially important when recording drums with multiple microphones.
- Check the relationship between kick and other microphones.
- Check snare top and bottom microphones.
- Check overheads against close microphones.
- Listen for loss of low end or a thin sound.
- Correct polarity or microphone placement when necessary.
Summary : Drum Recording Workflow
Drum tuning → Room setup → Microphone selection → Microphone placement → Sound check → Gain staging → Phase check → Test recording → Final recording
Conclusion:
Drum recording in a studio requires careful preparation, proper tuning, suitable microphone selection, precise microphone placement, and controlled room acoustics. Each stage plays an important role in capturing the natural tone, punch, dynamics, and energy of the drum kit.
Ultimately, a great drum recording begins with a well-prepared kit and a carefully executed recording process. Proper recording techniques not only reduce mixing difficulties but also provide a strong rhythmic foundation that enhances the overall quality and impact of the music production.
At Soundpoint Pro, Chennai, students receive hands-on training in professional drum recording, drum miking techniques, microphone placement, drum tuning, and studio recording techniques using professional and industry-standard recording equipment.
Our Sound Engineering and Music Production courses teach students how to capture the natural tone, punch, dynamics, depth, and character of a complete drum kit using professional recording microphones and studio equipment.
Whether you are interested in Sound Engineering, Audio Engineering, Music Production, Recording Engineering or Studio Recording, Soundpoint Pro provides practical training to help you develop real-world recording skills.
Learn professional Recording and Miking Techniques at Soundpoint Pro, Chennai, and gain hands-on experience to be a Pro Audio engineer.
Sound Engineering Course in Chennai, Music Production Course in Chennai, Sound Engineering Institute in Chennai, Music Production Institute in Chennai, Audio Engineering Course, Audio Production Course, Recording Engineering Course, Studio Recording Course, Mixing and Mastering Course, Live Sound Engineering Course, Music Production Training, Sound Engineering Training, Audio Engineering Training, Music Production Classes, Sound Engineering Classes, Sound Design Course, Foley Recording Course, Sound Effects Course, Pro Tools Training, Music Programming Course, EDM Production Course, Professional Sound Engineering Course, Best Sound Engineering Institute in Chennai, Best Music Production Institute in Chennai, Sound Engineer Course Chennai, Music Producer Course Chennai.